# Set Up Unifi

### <span style="color: #222222; font-size: 1.666em; font-weight: 400;">Set up Unifi on Linux</span>

<span style="color: #222222; font-size: 1.666em; font-weight: 400;">If you are using a RockPi as a controller, click [HERE](https://docs.gamma.tech/link/75#bkmrk-set-up-unifi-on-linu)</span>

#### Otherwise click [HERE](https://docs.gamma.tech/link/75#bkmrk-set-up-unifi-on-wind)

#### <span style="color: #222222; font-size: 1.666em; font-weight: 400;">SSH into RockPi</span><span style="color: #222222; font-size: 1.666em; font-weight: 400;"> and perform some updates.</span>

1. To SSH into the server we will be using Putty. Download and install [Putty](https://www.chiark.greenend.org.uk/~sgtatham/putty/latest.html).
2. Open up putty and type in the IPv4 address of your server and click open.
3. Log into your RockPi with the username `rock` and password `rock`
4. Start with making sure we have the latest updates installed.

<div id="bkmrk-console-sudo-apt-upd"><div><div><div><span class="language xml xml">Console</span></div></div><div><div><div><div><div><div>```
<span role="presentation">sudo apt update</span>
```

```
<span role="presentation">sudo apt upgrade</span>
```

```
<span role="presentation">sudo apt-get install ca-certificates wget -y</span>
```

</div></div></div></div></div></div></div></div>5\. Give it a few minutes for the updates to install and afterwards run the following command to reboot.

<div id="bkmrk-console-reboot"><div><div><div><span class="language xml xml">Console</span></div></div><div><div><div><div><div><div>```
<span role="presentation">reboot</span>
```

</div></div></div></div></div></div></div></div>#### Lets Install UniFi SDN Control Panel on Ubuntu 20.04

1. Once the server is rebooted and your reconnected into the server using SSH we will now get started with running the following command.

<div id="bkmrk-console-rm-unifi-lat"><div><div><div><span class="language xml xml">Console</span></div></div><div><div><div><div><div><div>```
<span role="presentation">rm unifi-latest.sh <span class="cm-error">&</span>> /dev/null; wget https://get.glennr.nl/unifi/install/install_latest/unifi-latest.sh <span class="cm-error">&&</span> bash unifi-latest.sh</span>
```

</div></div></div></div></div></div></div></div>2\. You will be prompted to keep the script which here I type in: Y  
3\. You will be prompted to apply some updates to the system, type in: Y  
4\. Now just wait while the installation proceeds to install some required software.  
5\. Next prompt will be to install script to be able to update Unifi Network Controller via APT, type in: Y  
6\. You should now be complete with the installation.  
7\. Lets make sure that the Unifi Controller service auto starts with the following command.

<div id="bkmrk-console-sudo-systemc"><div><div><div><span class="language xml xml">Console</span><div></div></div></div><div><div><div><div><div><div>```
<span role="presentation">sudo systemctl enable unifi</span>
```

</div></div></div></div></div></div></div></div>#### Installing Fail2ban

Fail2ban will protect your cloud hosted Unifi Controller from brute force attacks. This script will ban people after 4 failed attempts for 10 minutes.

<div id="bkmrk-console-rm-unifi-fai"><div><div><div><span class="language xml xml">Console</span></div></div><div><div><div><div><div><div></div><div>```
<span role="presentation">rm unifi-fail2ban.sh <span class="cm-error">&</span>> /dev/null; wget https://get.glennr.nl/unifi/extra/unifi-fail2ban.sh <span class="cm-error">&&</span> bash unifi-fail2ban.sh</span>
```

</div></div></div></div></div></div></div></div><div id="bkmrk-"></div><div id="bkmrk--0"></div><div id="bkmrk--1"></div><div id="bkmrk--2"></div><div id="bkmrk--3"></div>### <span style="color: #222222; font-size: 1.666em; font-weight: 400;">Set up Unifi on Windows</span>

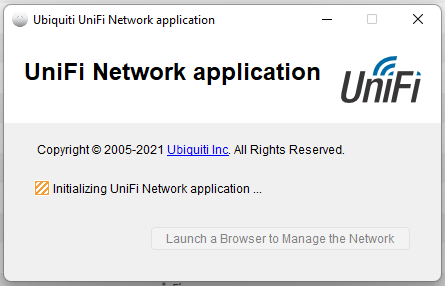
<div id="bkmrk--4"></div><div id="bkmrk-1%29-install-the-unifi">1) Install the Unifi controller for the specific model of Unifi equipment from this link: [https://www.ui.com/download/unifi/](https://www.ui.com/download/unifi/)</div><div id="bkmrk--5"></div><div id="bkmrk-2%29-run-the-downloade">2) Run the downloaded installer and continue through the setup process</div><div id="bkmrk--6"></div><div id="bkmrk-3%29-run-the-installed"><div>3) Run the installed Unifi controller  
  
</div></div>[![image-1649271304513.png](https://docs.gamma.tech/uploads/images/gallery/2022-04/scaled-1680-/nAUrM8WNzqEgtR4h-image-1649271304513.png)](https://docs.gamma.tech/uploads/images/gallery/2022-04/nAUrM8WNzqEgtR4h-image-1649271304513.png)

<div id="bkmrk-4%29-the-unifi-control">4) The Unifi controller will start up, once started click **Launch Browser to Manage the Network**</div><div id="bkmrk--8"></div>[![image-1649271423694.png](https://docs.gamma.tech/uploads/images/gallery/2022-04/scaled-1680-/K7SNf0weNm2OKHDv-image-1649271423694.png)](https://docs.gamma.tech/uploads/images/gallery/2022-04/K7SNf0weNm2OKHDv-image-1649271423694.png)

<div id="bkmrk--10"></div><div id="bkmrk-5%29-you-will-be-taken">5) You will be taken to a web page where you can configure the Unifi network equipment and the controller</div><div id="bkmrk--11"></div><div id="bkmrk--12"></div><div id="bkmrk--13"></div><div id="bkmrk--14"></div>### <span style="text-decoration: underline;">Adding the controller to the UniFi Account</span>

1-Go to the IP of the device on port 8443 EX -`192.168.1.12:8443`

<p class="callout warning">Make sure you type https:// before the IP or you will get a Error Message</p>

It will tell you that <span style="background-color: #ffff99;">"Your connection is not Private"<span style="background-color: #ffffff;"> Click on <span style="background-color: #ffff99;">**ADVANCED** </span>and then on<span style="background-color: #ffff99;"> </span><span style="background-color: #ffff99;">**Proceed to 192.168.1.170 (unsafe)**</span></span></span>

[![image-1639491431503.png](https://docs.gamma.tech/uploads/images/gallery/2021-12/scaled-1680-/hDqLsxhjjBmdFEpn-image-1639491431503.png)](https://docs.gamma.tech/uploads/images/gallery/2021-12/hDqLsxhjjBmdFEpn-image-1639491431503.png)

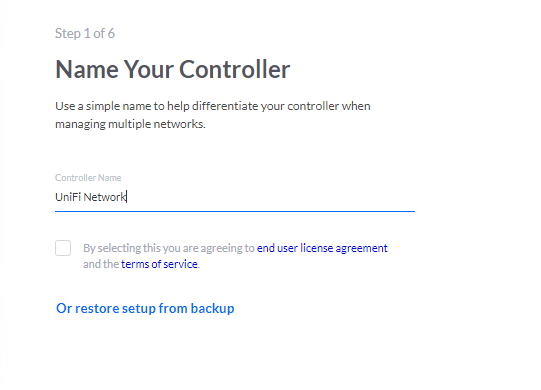
2-Here we will <span style="background-color: #ffff99;">name our controll<span style="font-family: -apple-system, BlinkMacSystemFont, 'Segoe UI', Oxygen, Ubuntu, Roboto, Cantarell, 'Fira Sans', 'Droid Sans', 'Helvetica Neue', sans-serif; font-size: 14px; font-style: normal; font-variant-ligatures: normal; font-variant-caps: normal; font-weight: 400; background-color: #ffff99;">e</span>r</span>.

<p class="callout info">Idea Of Naming is **RockPi-x** where **x** is a unique number.</p>

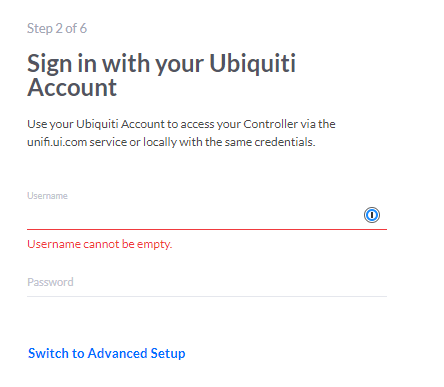
<span style="background-color: #ffffff;">3-Next, login using our `av@gtmail.us` UniFi account</span>

[![image-1639492217235.png](https://docs.gamma.tech/uploads/images/gallery/2021-12/scaled-1680-/o7U8JyYnnXPfBP0W-image-1639492217235.png)](https://docs.gamma.tech/uploads/images/gallery/2021-12/o7U8JyYnnXPfBP0W-image-1639492217235.png)

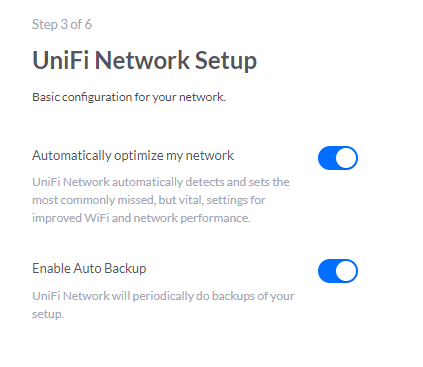
4-Next, Enable "<span style="background-color: #ffff99;">**Automatically Optimize my network**</span>" and click <span style="background-color: #ffff99;">**NEXT**</span>

[![image-1639492299760.png](https://docs.gamma.tech/uploads/images/gallery/2021-12/scaled-1680-/Gt8qCL2LpMY70vgC-image-1639492299760.png)](https://docs.gamma.tech/uploads/images/gallery/2021-12/Gt8qCL2LpMY70vgC-image-1639492299760.png)

5-Click <span style="background-color: #ffff99;">**NEXT** </span>Again

6-Under **<span style="background-color: #ffff99;">WIFI Setup</span>** click <span style="background-color: #ffff99;">**Skip**</span>

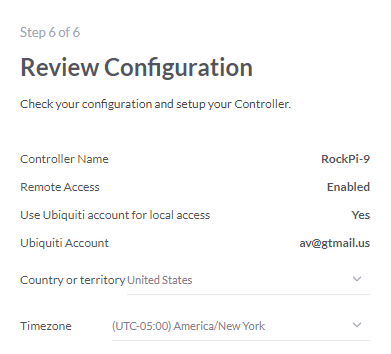
7-Make sure everything is Correct including Time Zone and click <span style="background-color: #ffff99;">**Finish**</span>

[![image-1639493031919.png](https://docs.gamma.tech/uploads/images/gallery/2021-12/scaled-1680-/rbNpPW8aEn0IAMx7-image-1639493031919.png)](https://docs.gamma.tech/uploads/images/gallery/2021-12/rbNpPW8aEn0IAMx7-image-1639493031919.png)

### And That's it, you should see it under the UniFi app and use it as a Controller adding devices etc.