Windows How-To
- Collecting System Specifications in Windows
- How to Unpair a Bluetooth Device on Windows 10 PC
- How to Restart Video Graphics Driver of Display Adapter in Windows 8 and Windows 10
- Change Default Sound Input Device from Settings
- How to Open Settings in Windows 10
- How to Restart the Computer in Windows 10
- How to Open Win+X Quick Link Menu in Windows 10
- How to Open Windows PowerShell in Windows 10
- How to Open a Command Prompt in Windows 10
- How to Add or Remove 'Open PowerShell window here' context menu in Windows 10
- How to Open and Use All apps in Windows 10 Start menu
- How to open a reverse tunnel through a Windows PC to access the LAN
- How to Change Computer Sleep
- Contract Testing
- How to Get the Phone IP
- Set Up Unifi
- Remove / Forgetting a WIFI Profile
Collecting System Specifications in Windows
Using the System Information (msinfo32) within Windows
 Note
Note1. Press the Windows + R keys at the same time to open the Run dialog box.
2. In the popup box, type msinfo32 and select Ok or hit enter on the keyboard.
 Note
Note
3. To save this information, select the File option followed by the Save option.
 Tip -You can also choose to Export from this File menu to generate a text document instead.
4. When prompted for a save location, choose an appropriate save location.
Using the DirectX Diagnostic Tool
1. Press the Windows + R keys at the same time to open the Run dialog box.
2. In the popup box, type dxdiag and select Ok or hit enter on the keyboard. If prompted about digital signatures, select Yes
 Note
Note
3. To save this information, click the Save All Information button towards the bottom of the window.

4. When prompted for a save location, choose an appropriate save location.
Generating a Speccy Report
 Information
 Warning
1. Download the free version of Speccy using the official download page.
2. Once downloaded, open the installer and select to not install CCleaner at the bottom. Next, select the Customize option underneath the Install button.
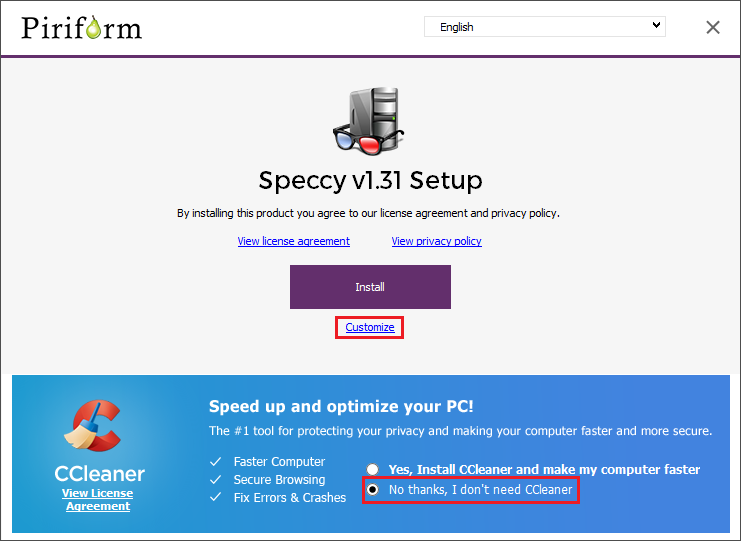
3. Opt in or out of any options you choose to select for your system. Then, select Install.

4. Press the Run Speccy button at the end of installation.

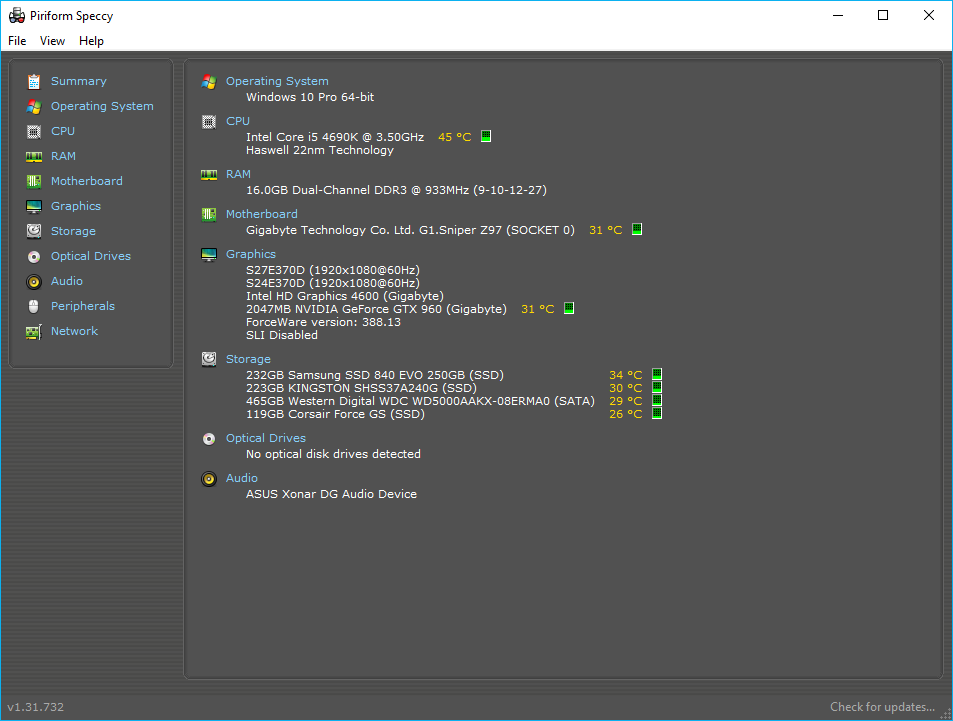

Using the Device Management Tool
InformationSince a driver is needed for ideal operation of computer hardware, you can detect and see what is currently communicating with the system through this driver.
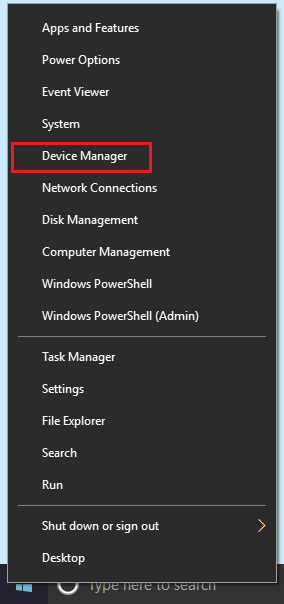
Warning1. Right click the Windows Start Menu icon and select Device Manager.
 Information
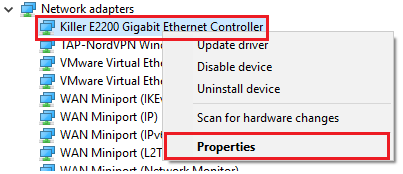
2. To view hardware, expand the category and right click on the device. Select to view its Properties.
How to Unpair a Bluetooth Device on Windows 10 PC
Bluetooth is a short range wireless technology which enables wireless data transmission between two Bluetooth–enabled devices located nearby each other.
If one Bluetooth–enabled (turned on) device is in discovery mode and discovers another Bluetooth–enabled device nearby, it can query for its services and choose to establish a Bluetooth link, or a 'pairing relationship', with the other Bluetooth–enabled device. Establishing a Bluetooth link with another Bluetooth–enabled device is also known as pairing.
Wireless devices with Bluetooth radios must be paired with each other before they can communicate.
Once the two devices have been paired, they will automatically connect to each other when they are within range and have Bluetooth turned on.
This tutorial will show you how to remove a paired Bluetooth device on your Windows 10 PC.
Here's How:
1. Open Settings, and click/tap on the Devices icon.
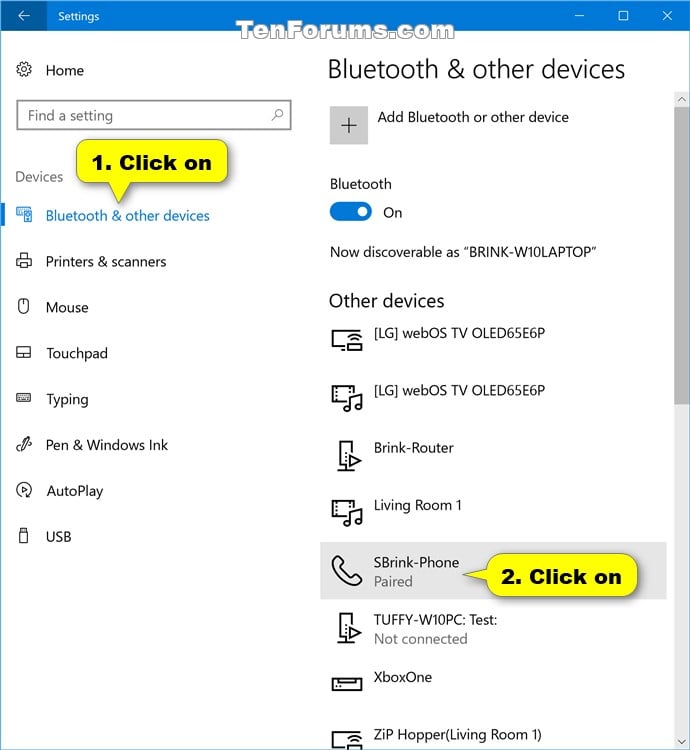
2. Click/tap on Bluetooth & other devices on the left side, and click/tap on the paired Bluetooth device (ex" "SBrink-Phone") you want to remove on the right side. (see screenshot below)
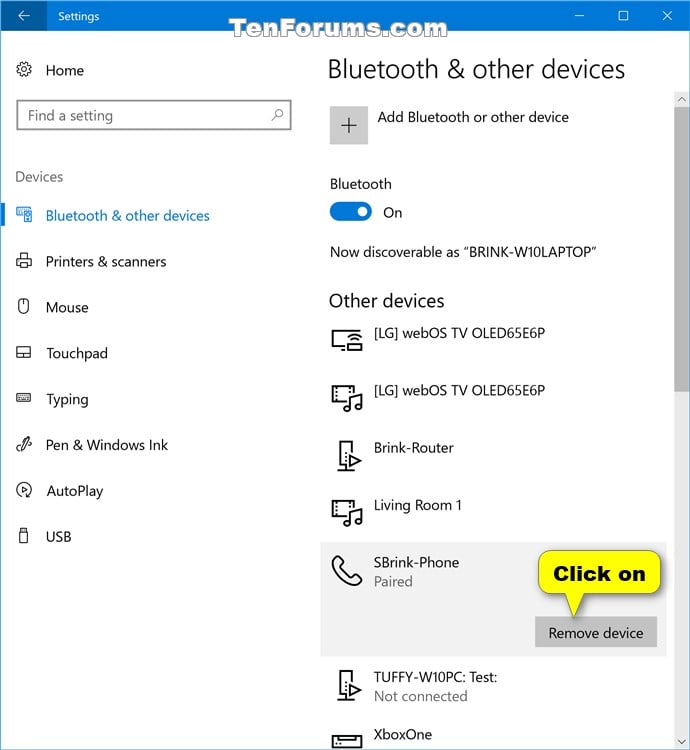
3. Click/tap on the Remove device button. (see screenshot below)
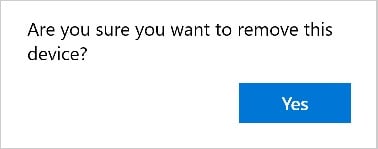
4. Click/tap on Yes to confirm. (see screenshot below)
That's it,
How to Restart Video Graphics Driver of Display Adapter in Windows 8 and Windows 10
Windows 8 and Windows 10 includes an easy method to restart your graphics drivers on demand as needed. This includes restarting NVIDIA, AMD, and Intel graphics drivers.
If you are having an issue with your video drivers, you could try restarting them to see if that may solve the issue without needing to restart the computer.
This tutorial will show you how to restart the video graphics drivers of your display adapter(s) in Windows 8 and Windows 10.
Here's How:
1 Press the Win + Ctrl + Shift + B keys.
2 Your screen will now go blank for a second and you will hear a beep.
3 Everything will now automatically reappear as it was before pressing the keys. Anything open and running will still be.
Change Default Sound Input Device from Settings
This option is only available starting with Windows 10 build 17035.
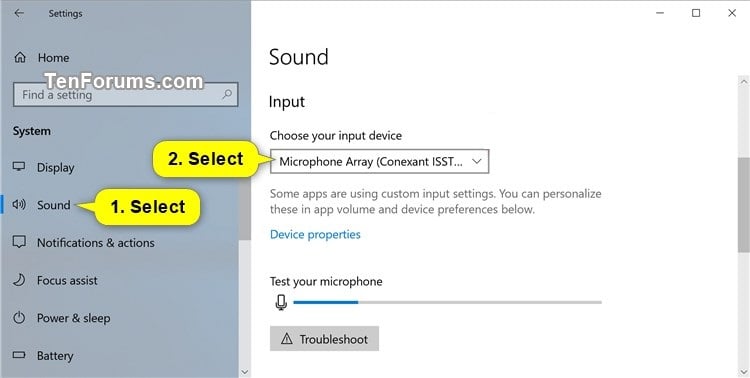
1 Open Settings, and click/tap on the System icon.
2 Click/tap on Sound on the left side, and Choose your input device you want from the drop menu on the right side. (see screenshot below)
You will not be able to choose if you do not have more than one input device connected.
3 When finished, you can close Settings if you like.
Change Default Sound Input Device from Sound Control Panel
If you like, you can open Run (Win+R), copy and paste the command below into Run, and click/tap on OK to directly open "Recording" devices in the Sound panel.[/I]rundll32.exe shell32.dll,Control_RunDLL mmsys.cpl,,1
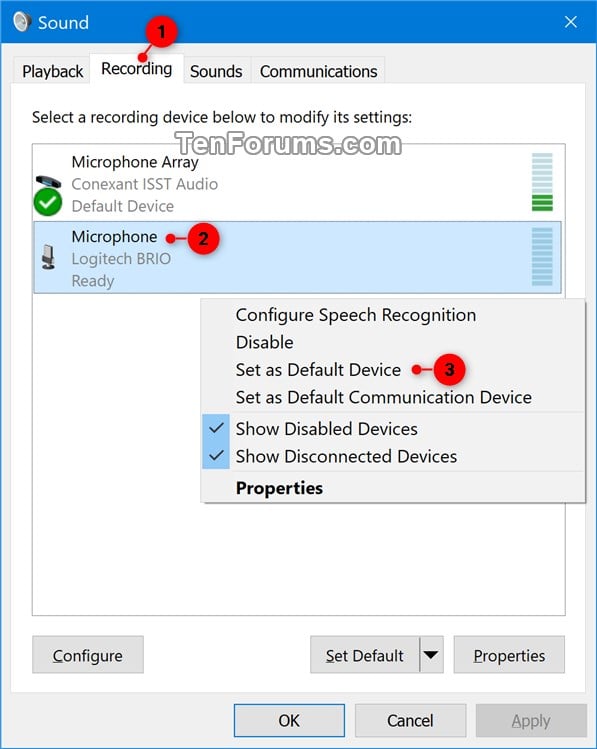
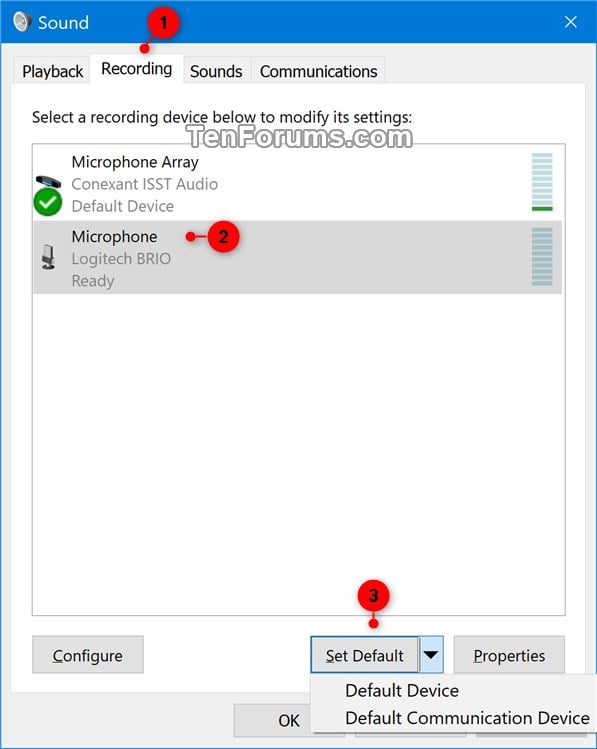
2 Click/tap on the Recording tab, and perform one of the actions below you want to use to set the default input (recording) device. (see screenshots below)
- Right click or press and hold on the recording device, and click/tap on Set a Default Device.
- Select a recording device, and either:
- Click/tap on Set Default to set for both "Default Device" and "Default Communication Device".
- Click/tap on the drop menu arrow to the right of Set Default, and click/tap on Default Device.
- Click/tap on the drop menu arrow to the right of Set Default, and click/tap on Default Communication Device. This will not be set as the "Default Device"
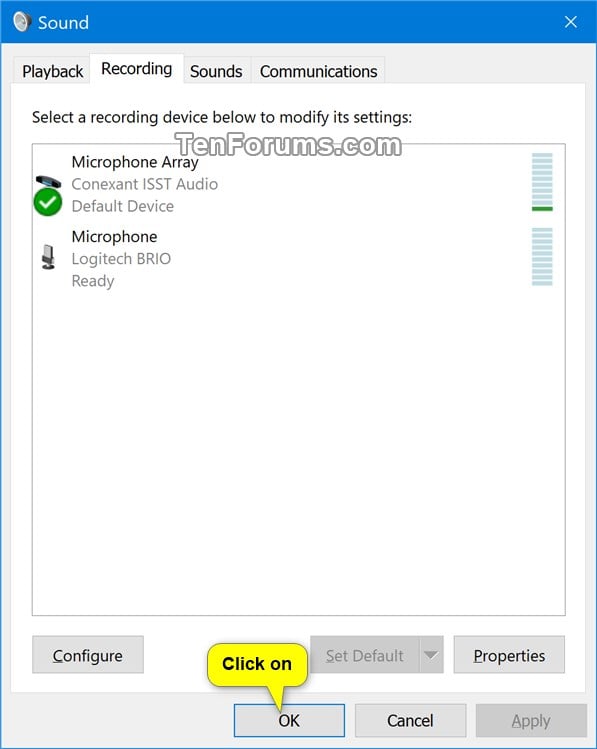
3 Click/tap on OK when finished. (see screenshot below)
That's it,
How to Open Settings in Windows 10
Most of the settings you'll want to change in Windows 10 are in Settings. Settings is organized into the separate System, Devices, Phone, Network & Internet, Personalization, Apps, Accounts, Time & language, Gaming, Ease of Access (Accessibility), Search, Privacy, Update & Security, and Mixed Reality (if available) categories. You can click/tap on a category to view and change more settings for that category.
Starting with Windows 10 build 18350, Microsoft is introducing a new way to help users finish their Windows setup and quickly access some of the most frequently used settings. Inspired by the Microsoft account homepage, the Settings home page now has a header at the top allowing you to take quick action for things like signing in and managing your Microsoft account, making the Windows and Microsoft experience better. It also gives you an easy to glance at system status, such as when updates are available. Some of you may have already seen this in previous builds, but don’t worry if not, we’re continuing to roll this out slowly and you will see it in an upcoming build.
Starting with Windows 10 build 21359, the Ease of Access category in Settings has been renamed to Accessibility.
This tutorial will show you different ways to open the Settings app in Windows 10
Open Settings with Keyboard Shortcut
1 Press the Win + I keys.
Open Settings from Win+X Quick Link Menu

Open Settings from Start Menu
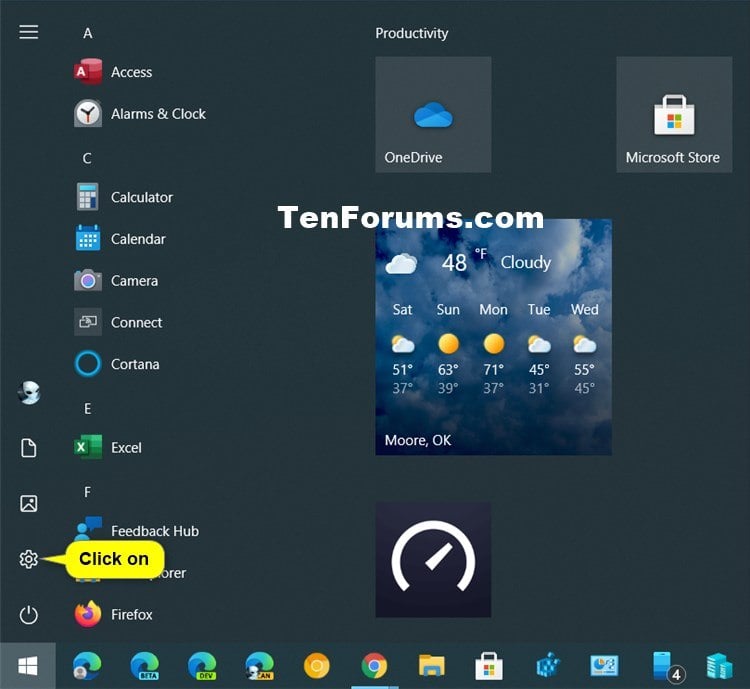
1 Open the Start menu .
2 Click/tap on the Settings (gear) button on the left side of the Start menu. (see screenshot below)
Open Settings from Action Center
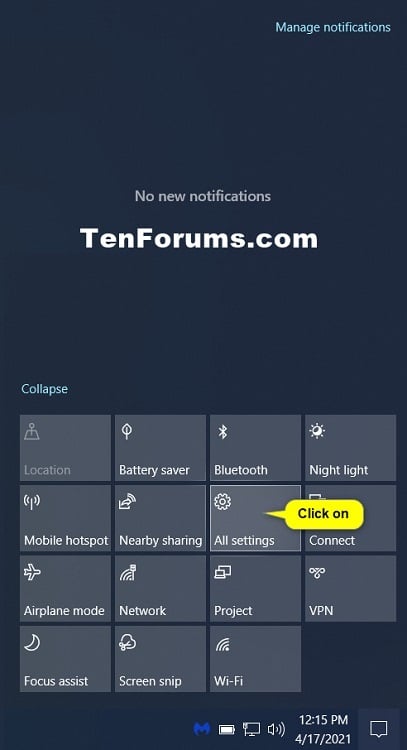
1 Open the Action Center (Win+A).
2 Click/tap on the All settings quick action button. (see screenshot below)
Open Settings from Search
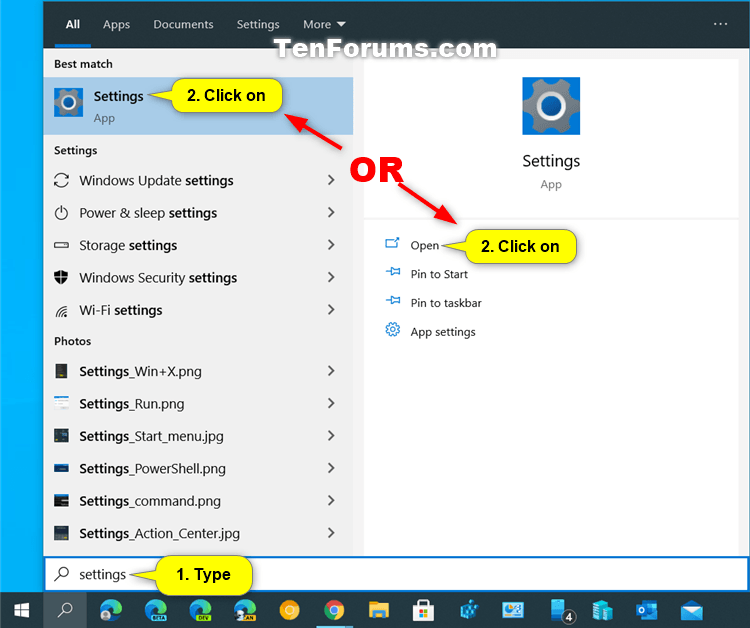
1 Open the Search (Win+S).
2 Type Settings into the search box. (see screenshot below)
3 Click/tap on Settings in the search results, or click/tap on Open if Settings is selected.
Open Settings from File Explorer
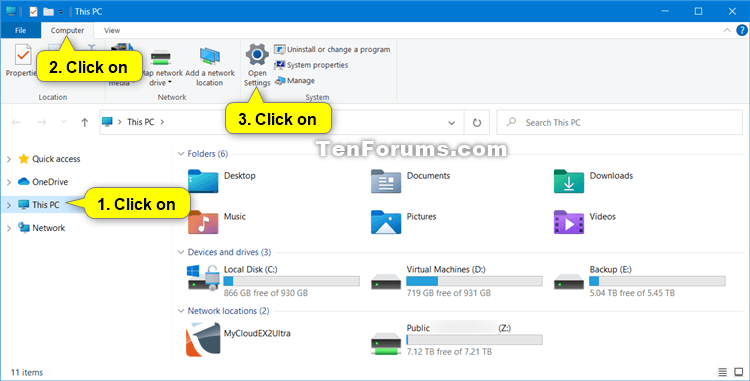
1 Open File Explorer (Win+E).
2 Click/tap on This PC in the navigation pane. (see screenshot below)
3 Click/tap on the Computer tab.
4 Click/tap on the Open Settings button in the ribbon.
Open Settings from Run
1 Open Run (Win+R).
2 Type
ms-settings: into Run, and click/tap on OK or press Enter. (see screenshot below)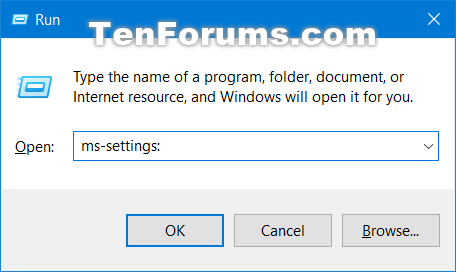
Open Settings from Command Prompt
1 Open a command prompt.
2 Copy and paste
start ms-settings: into the command prompt, and press Enter. (see screenshot below)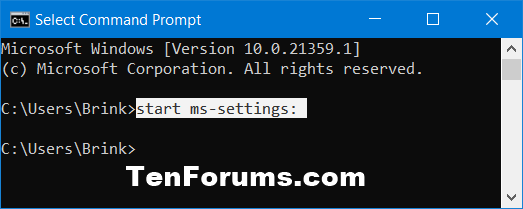
Open Settings from PowerShell
1 Open PowerShell.
2 Copy and paste
start ms-settings: into PowerShell, and press Enter. (see screenshot below)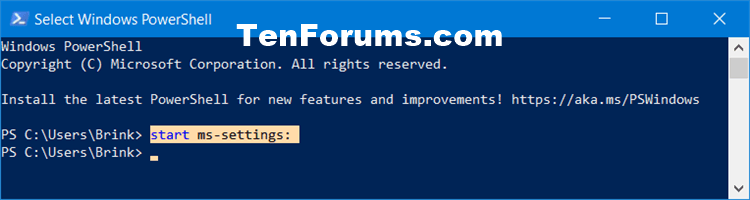
That's it,
How to Restart the Computer in Windows 10
Restart will close all apps, sign out all users, and full shutdown and restart (reboot) the PC.
This tutorial will show you different ways on how to restart your local Windows 10 PC.
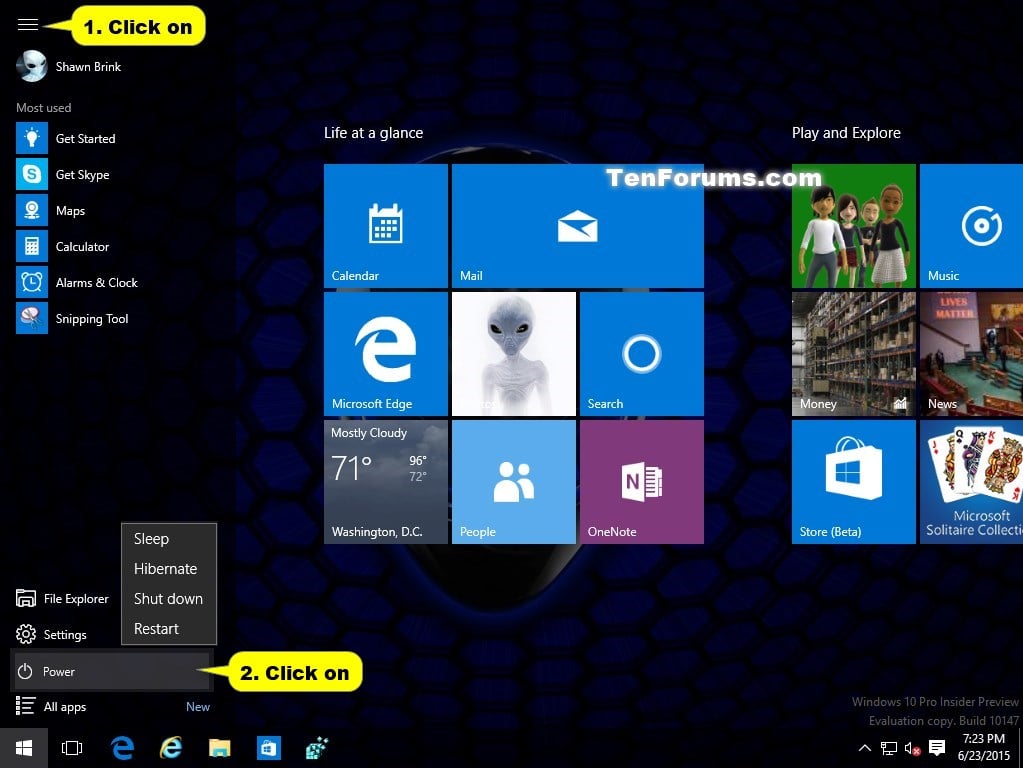
To Restart Computer from Start Menu
1 Open the Start menu , click/tap on the
 Power button, and click/tap on Restart. (see screenshots below)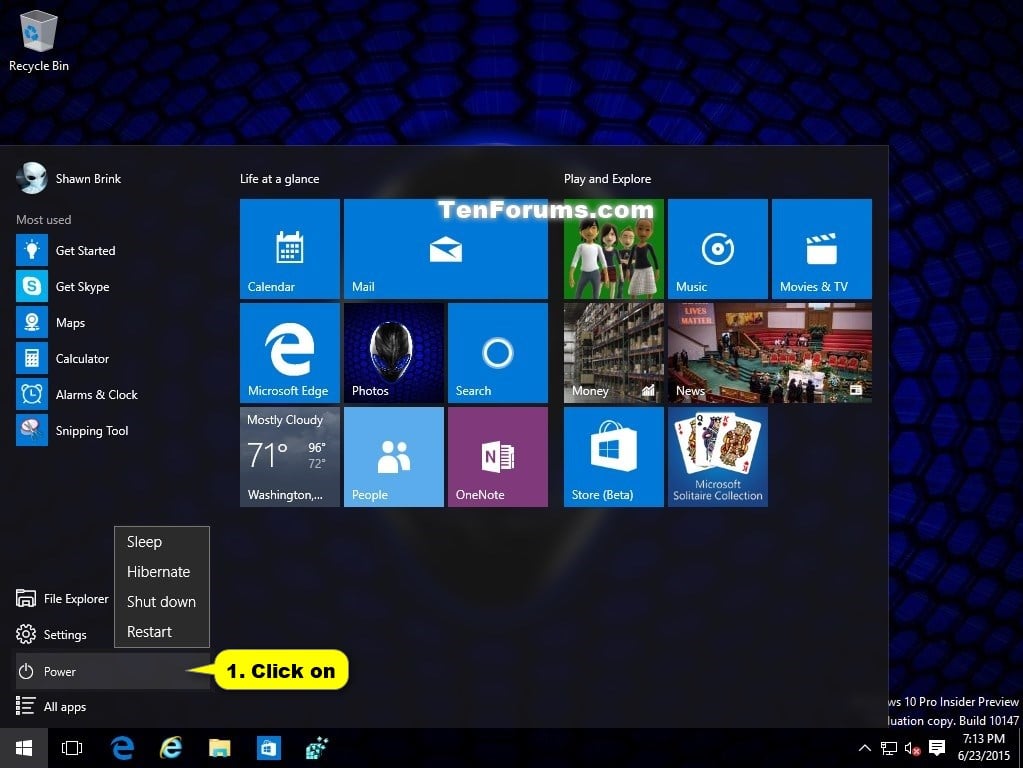
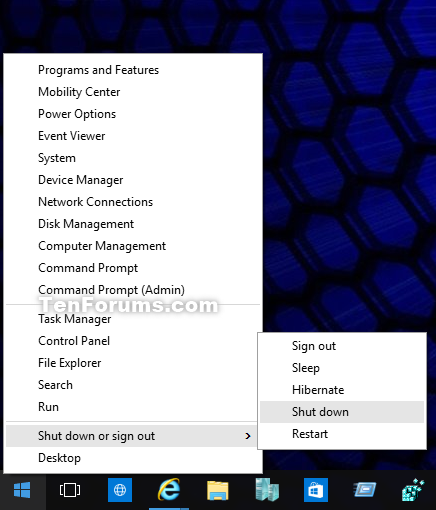
To Restart Computer from Win+X Quick Link Menu
1 Open the Win+X Quick Link menu, click/tap on Shut down or sign out, and click/tap on Restart. (see screenshot below)
OR
2 Press the Win + X keys, press U, and press R.
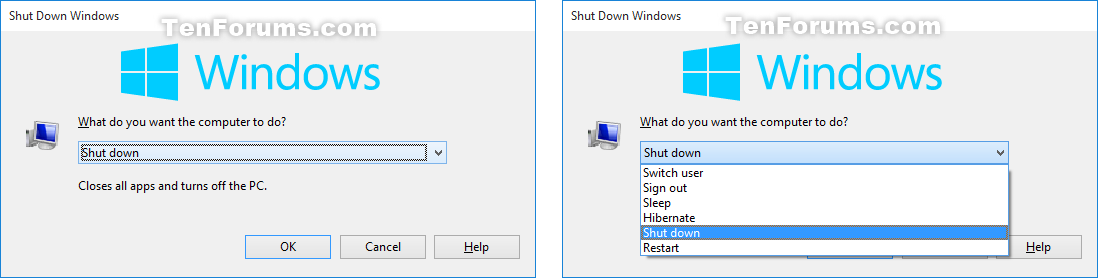
To Restart Computer from Alt+F4 Shut Down Windows Dialog
1 Click/tap on your desktop to make it the current focused (active) window, and press the Alt + F4 keys.
2 Select Restart in the drop down menu, and click/tap on OK or press Enter. (see screenshots below)
To Restart Computer from Ctrl+Alt+Del Screen
1 Press the Ctrl + Alt + Del keys, click/tap on the
Power button, and click/tap on Restart. (see screenshot below)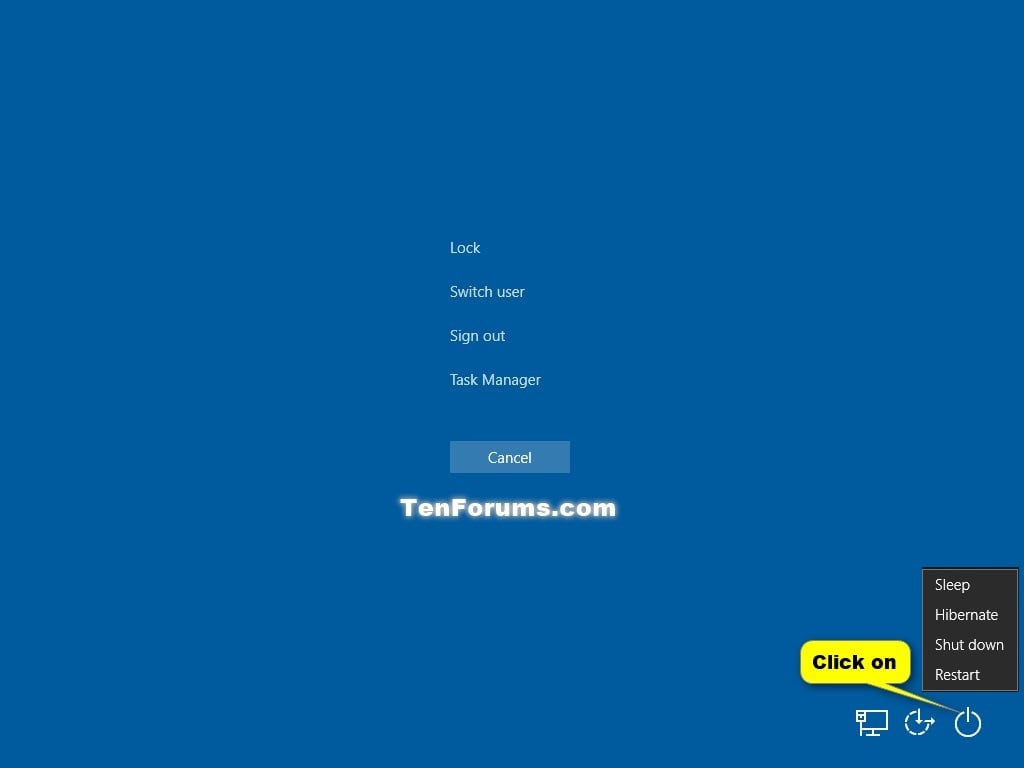
To Restart Computer from Sign-in Screen
2 While on the sign-in screen, click/tap on the
Power button, and click/tap on Restart. (see screenshot below)
To Restart Computer from Command Prompt
If you like, you can also run the commands below in the Run (Win+R) command dialog box.
Performs a full shutdown and restart the computer.
shutdown /r /f /t 0Immediately force running applications to close, and then performs a full shutdown and restart the computer.
shutdown /r /t xxxPerforms a full shutdown and restart the computer after a timeout period you specified in seconds.
Substitute xxx in the command above with between 0-315360000 seconds you want for the timeout period. If the timeout period is greater than 0, the /f (force) parameter is implied.
shutdown /r /c "Your comment here"Displays a warning with your comment, and performs a full shutdown and restart the computer.
Substitute Your comment here in the command above with the comment you want up to 512 characters.
shutdown /r /t xxx /c "Your comment here"Displays a warning notice with your comment, and performs a full shutdown and restart the computer after a timeout period you specified in seconds.
Substitute Your comment here in the command above with the comment you want up to 512 characters.
Substitute xxx in the command above with between 0-315360000 seconds you want for the timeout period. If the timeout period is greater than 0, the /f (force) parameter is implied.
shutdown /gPerforms a full shutdown and restart the computer. Will restart any applications that were open when you restarted after the system is rebooted and you sign in.
shutdown /g /c "Your comment here"Displays a warning with your comment, and performs a full shutdown and restart the computer. Will restart any applications that were open when you restarted after the system is rebooted and you sign in.
Substitute Your comment here in the command above with the comment you want up to 512 characters.
shutdown /g /t xxx /c "Your comment here"Displays a warning notice with your comment, and performs a full shutdown and restart the computer after a timeout period you specified in seconds. Will restart any applications that were open when you restarted after the system is rebooted and you sign in.
Substitute Your comment here in the command above with the comment you want up to 512 characters.
Substitute xxx in the command above with between 0-315360000 seconds you want for the timeout period. If the timeout period is greater than 0, the /f (force) parameter is implied.
To Restart Computer from PowerShell
To see all Restart-Computer options in Windows PowerShell 5.0, see: Restart-Computer
Performs a full shutdown and restart the computer.
restart-computer -forceForces running applications to close, and then performs a full shutdown and restart the computer.
restart-computer -confirmPrompts you to confirm before performing a full shutdown and restart the computer.
restart-computer -force -confirmPrompts you to confirm before forces running applications to close, and then performs a full shutdown and restart the computer.
To Perform an Emergency Restart in Windows 10
In some situations you may have to shut down and restart Windows very quickly. This would be an emergency restart. An emergency restart is basically just a forced restart without a timeout. (ex: shutdown.exe -R -T 00 -F)
An emergency restart can be helpful in circumstances when you cannot normally restart your computer, and is much better than turning off the power to your computer by performing a hard restart (reboot) which can be harmful to the computer.
1 Press the Ctrl + Alt + Delete keys.
2 Press and hold the Ctrl key, click/tap on the Power button, and release the Ctrl key. (see screenshot below)
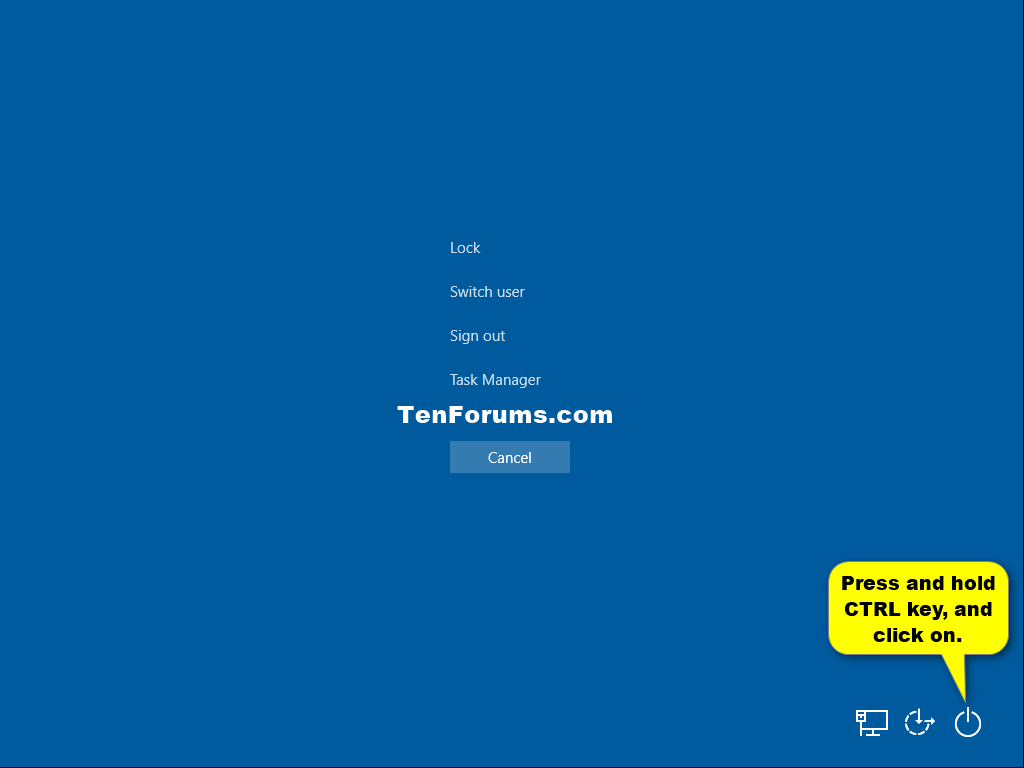
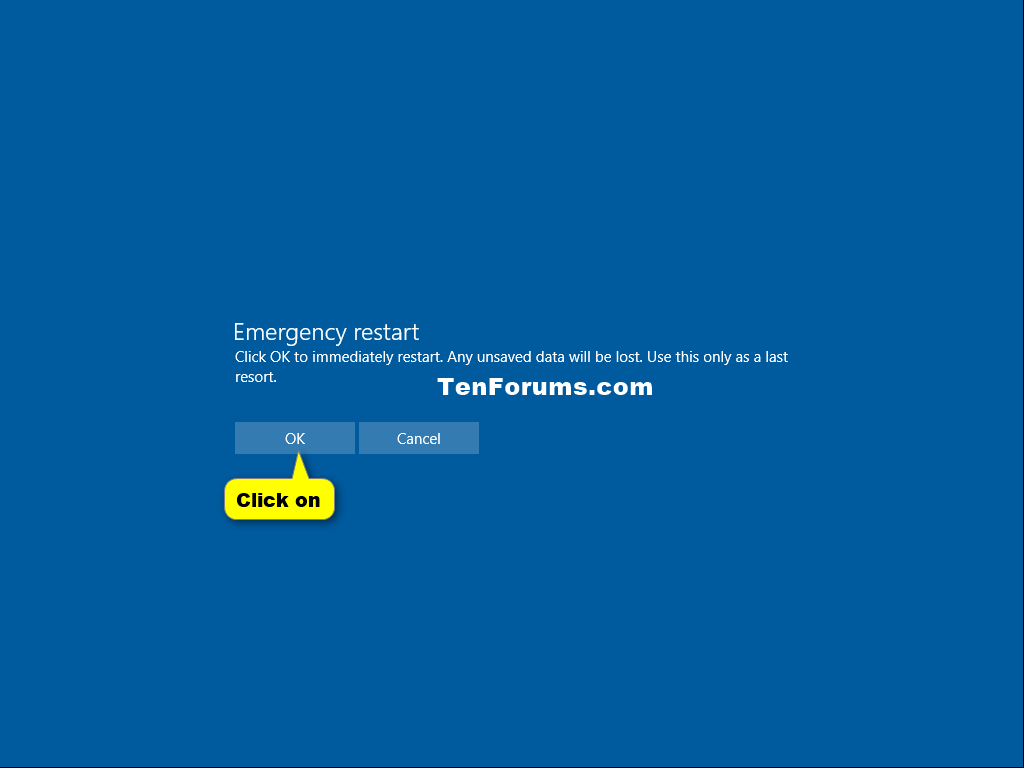
3 Click/tap on OK to restart the computer. (see screenshot below)
To Restart Computer using Cortana Voice Command
Starting with Windows 10 build 16251, you can now use a Hey Cortana voice command to restart the computer.
In addition, you can also ask Cortana to execute this command on the Lock screen, but first you should enable Cortana on the Lock screen if you have not done so already.
1 Using Hey Cortana, use the voice command below.
"Hey Cortana, restart my computer."
2 Cortana may ask you for a verbal confirmation. You’ll have to respond to Cortana with a "Yes" for Cortana to complete the voice command.
That's it,
How to Open Win+X Quick Link Menu in Windows 10
How to Open Win+X Quick Link Menu in Windows 10
The Win+X Quick Link menu is a pop-up menu from the Start button that includes shortcuts of common management, configuration, and other power user Windows tools.
Starting with Windows 10 build 15014, the Win+X flyout has been updated to say “Apps and Features” instead of “Programs and Features”.
This tutorial will show different ways on how to open the Win+X Quick Link menu in Windows 10.
EXAMPLE: Win+X Quick Link menu
Here's How:
1 Do step 2, step 3, or step 4 below for how you would like to open the Win+X Quick Link menu.
2 Press the Win + X keys and release.
Using this option will allow you to see the available underlined (letter) keyboard shortcuts to press for each menu item to open with.
3 Right click on the Start button on the taskbar.
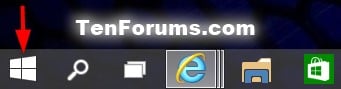
4 On a touchscreen, press and hold the Start button on the taskbar until you see the faded white rectangle appear on it, then release.

That's it,
How to Open Windows PowerShell in Windows 10
Windows 10 comes with Windows PowerShell 5.0 included.
Windows PowerShell is a task-based command-line shell and scripting language designed especially for system administration. Built on the .NET Framework, Windows PowerShell helps IT professionals and power users control and automate the administration of the Windows operating system and applications that run on Windows.
Open Windows PowerShell from All apps in Start Menu
1 Open All apps in the Start menu.
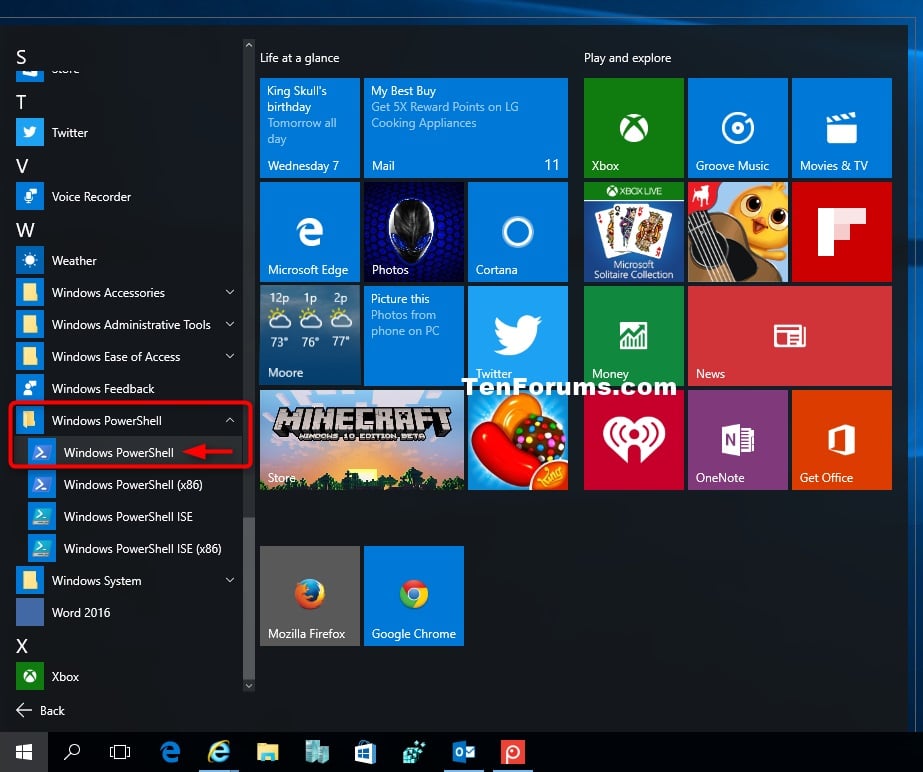
2 Scroll down and expand open the Windows PowerShell folder, and click/tap on Windows PowerShell. (see screenshot below)
Open Windows PowerShell in Search
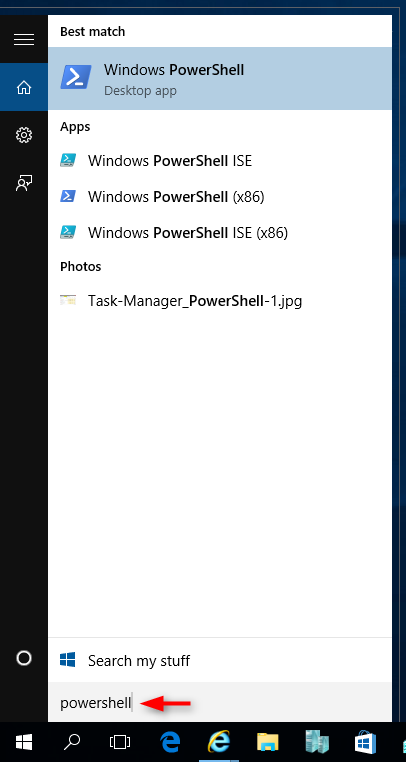
1 Press the [key]Win[key] + S keys to open Search.
2 Type powershell into the search box, and click/tap on Windows PowerShell in the search results at the top. (see screenshot below)
Open Windows PowerShell from Run
1 Press the Win + R keys to open Run.
2 Type powershell, and click/tap on OK in the search results at the top. (see screenshot below)

Open Windows PowerShell from Task Manager
1 Open Task Manager (Ctrl+Shift+Esc).
2 Click/tap on File (menu bar), and click/tap on Run new task. (see screenshot below)

3 Type powershell, and click/tap on OK in the search results at the top. (see screenshot below)

Open Windows PowerShell from Win+X Menu
1 If you have the Win+X menu set to show Windows PowerShell instead of Command Prompt, then press the Win + X keys to open the Win+X menu.
2 Click/tap on Windows PowerShell. (see screenshot below)

To "Open Windows PowerShell Here" in File Explorer
1 Open File Explorer (Win+E).
2 Select or open a folder or drive that you want to open Windows PowerShell at that location. (see screenshot below)
3 Click/tap on the File tab on the ribbon, click/tap on Open Windows PowerShell to expand, and click/tap on Open Windows PowerShell. (see screenshot below)

Open Windows PowerShell from File Explorer
1 While you have a folder or drive open in File Explorer (Win+E), type PowerShell into the address bar, and press Enter to open PowerShell in whatever folder or drive you have open.
OR
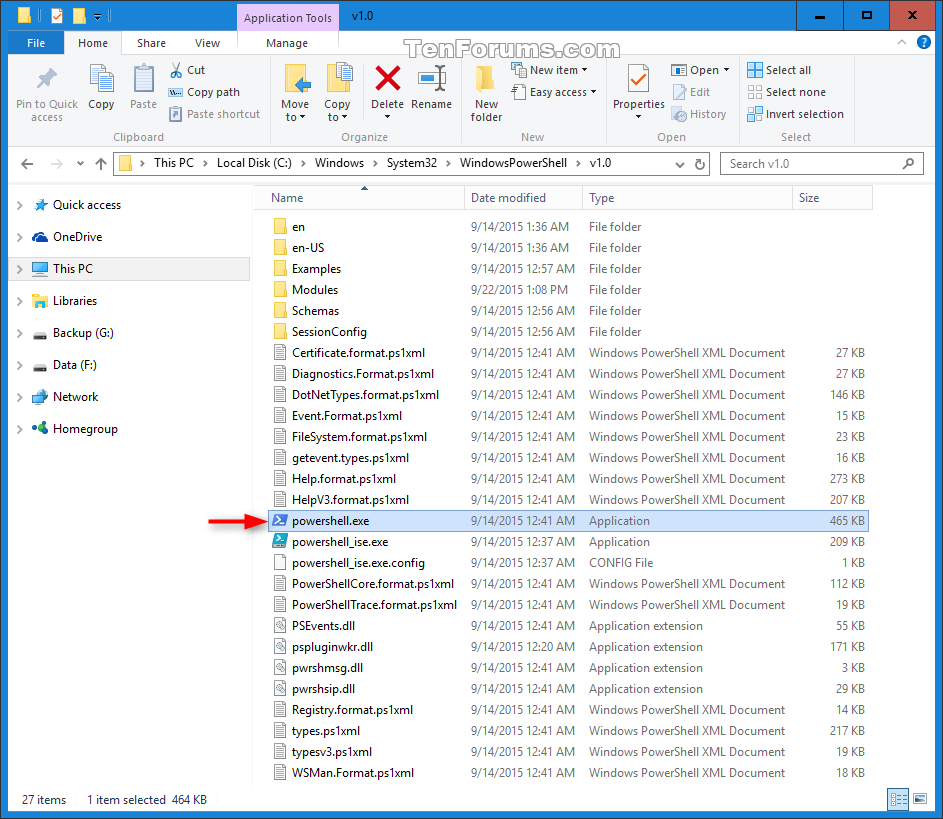
2 Open File Explorer (Win+E), browse to the folder location below, and click/tap on the powershell.exe file to run it. (see screenshot below)
C:\Windows\System32\WindowsPowerShell\v1.0
That's it,
How to Open a Command Prompt in Windows 10
A command prompt is an entry point for typing computer commands in the Command Prompt window. By typing commands at the command prompt, you can perform tasks on your computer without using the Windows graphical interface.
This tutorial will show you different ways to open a command prompt in Windows 10.
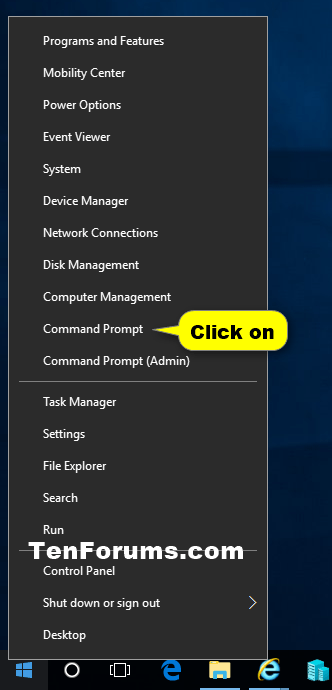
Open Command Prompt from Win+X Quick Link Menu
Starting with Windows 10 build 14971, Windows PowerShell will show in the Win+X menu by default now instead of Command Prompt.
Show Command Prompt or Windows PowerShell on Win+X menu in Windows 10 - Windows 10 Customization Tutorials
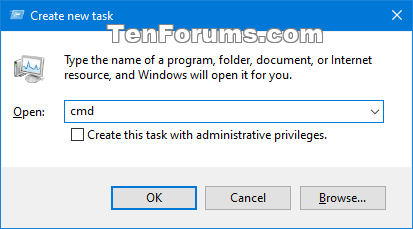
Open Command Prompt from Task Manager
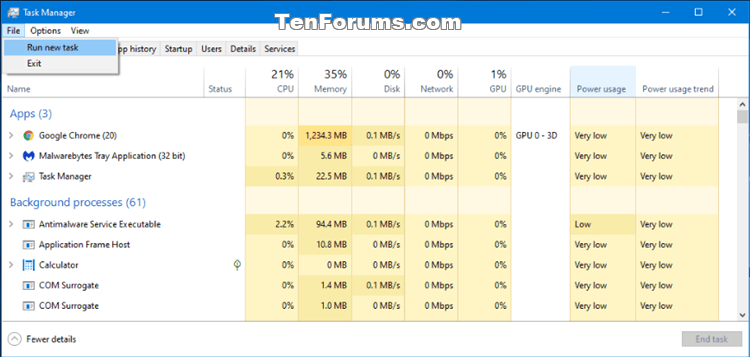
1 Open Task Manager with more details.
2 Click/tap on File (menu bar), and click/tap on Run new task. (see screenshot below)
3 Type
cmd or cmd.exe, and click/tap on OK. (see screenshot below)
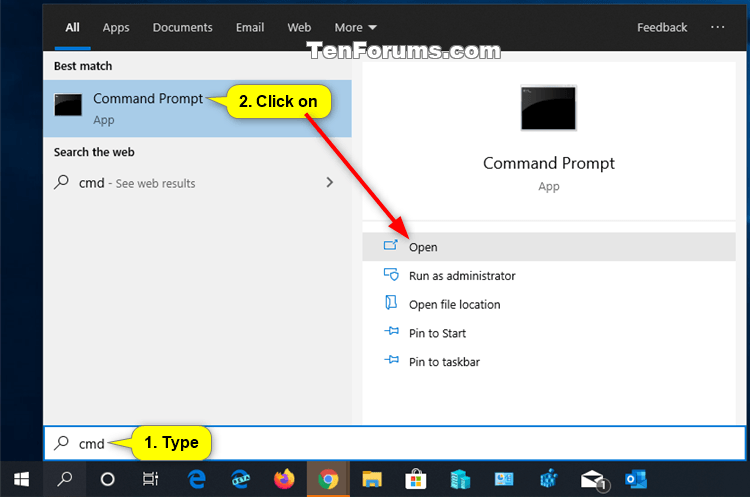
Open Command Prompt in Search
1 Press the Win + S keys to open Search.
2 Type
cmd into the search box. (see screenshot below)3 When Command Prompt shows up in the search results, click/tap on it.
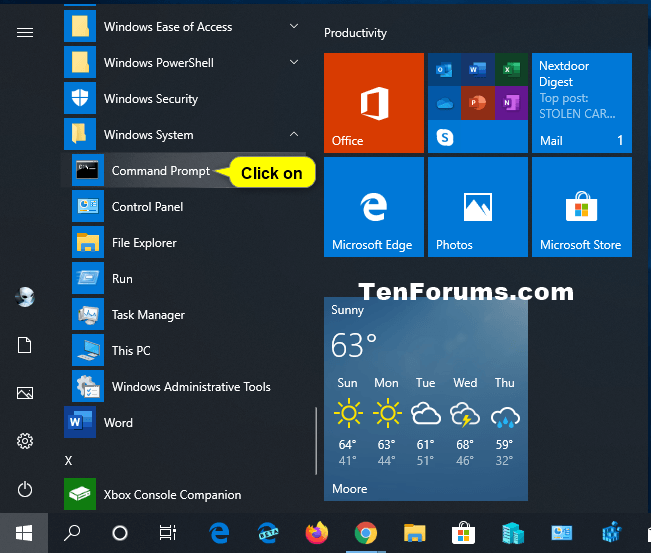
Open Command Prompt from All apps in Start Menu
1 Open the Start menu, and click/tap on All Apps at the bottom. (see screenshot below)
2 In All Apps, scroll down and expand open the Windows System folder, then click/tap on Command Prompt.
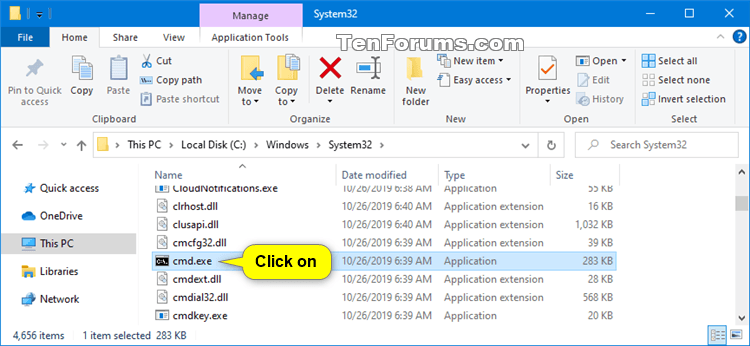
Open Command Prompt from File Explorer
1 While you have a folder or drive open in File Explorer (Win+E), type cmd into the address bar, and press Enter to open the command prompt in whatever folder or drive you have open.
OR
2 Open File Explorer (Win+E), navigate to the C:\Windows\System32 folder, and click/tap on the cmd.exe file. (see screenshot below)
Open Command Prompt from Run
1 Press the Win + R keys to open Run.
2 Type
cmd, and click/tap on OK. (see screenshot below)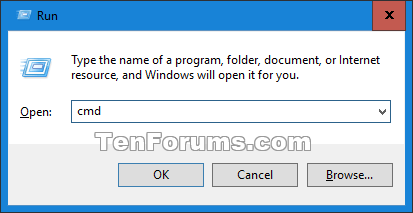
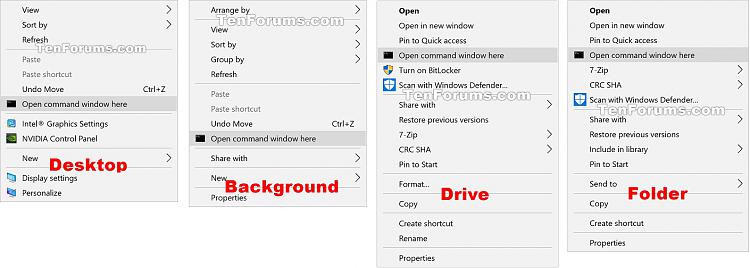
To "Open Command Window Here" in File Explorer
This option allows you to open a command prompt that opens to the same location as the selected folder or drive.
Starting with Windows 10 build 14986, the Open command window here context menu item has been removed by default and replaced with the Open PowerShell window here context menu item.
How to Add 'Open command window here' context menu in Windows 10
1 In File Explorer, press and hold the Shift key, right click or press and hold on a folder or drive that you want to open the command prompt at that location, release the Shift key, and click/tap on Open command window here. (see screenshot below)
That's it,
How to Add or Remove 'Open PowerShell window here' context menu in Windows 10
Windows 10 comes with Windows PowerShell 5.0 included.
Windows PowerShell is a task-based command-line shell and scripting language designed especially for system administration. Built on the .NET Framework, Windows PowerShell helps IT professionals and power users control and automate the administration of the Windows operating system and applications that run on Windows.
For more details about Windows PowerShell, see:
This tutorial will show you how to add or remove the Open PowerShell window here context menu for all users in Windows 10.
While you must be signed in as an administrator to add or remove the "Open PowerShell window here" context menu, all users can use the context menu.
The "Open PowerShell window here" context menu will be available when you right click or shift + right click on a folder or drive, and when you right click or shift + right click on the background of a folder, drive, library background, or desktop.
Starting with Windows 10 build 14986, the Open command window here context menu item has been removed by default and replaced with the Open PowerShell window here context menu item.
Here's How:
1 Press the Win+R keys to open Run, type regedit, and press Enter to open Registry Editor.
2 In Registry Editor, navigate to the location below. (see screenshot below)
HKEY_CLASSES_ROOT\Directory\shell\Powershell

3 Change the owner of the Powershell registry key in the left pane to be the Administrators group. (see screenshot below step 2)
4 Set permissions of the Powershell registry key in the left pane to "Allow" the Administrators group "Full control". (see screenshot below step 2)
5 In Registry Editor, navigate to the location below. (see screenshot below step 2)
HKEY_CLASSES_ROOT\Directory\shell\Powershell\command
6 Change the owner of the command registry key in the left pane to be the Administrators group. (see screenshot below step 2)
7 Set permissions of the command registry key in the left pane to "Allow" the Administrators group "Full control". (see screenshot below step 2)
8 In Registry Editor, navigate to the location below. (see screenshot below)
HKEY_CLASSES_ROOT\Directory\Background\shell\Powershell

9 Change the owner of the Powershell registry key in the left pane to be the Administrators group. (see screenshot below step 8)
10 Set permissions of the Powershell registry key in the left pane to "Allow" the Administrators group "Full control". (see screenshot below step 8)
11 In Registry Editor, navigate to the location below. (see screenshot below step 8)
HKEY_CLASSES_ROOT\Directory\Background\shell\Powershell\command
12 Change the owner of the Powershell registry key in the left pane to be the Administrators group. (see screenshot below step 8)
13 Set permissions of the Powershell registry key in the left pane to "Allow" the Administrators group "Full control". (see screenshot below step 8)
14 In Registry Editor, navigate to the location below. (see screenshot below)
HKEY_CLASSES_ROOT\Drive\shell\Powershell

15 Change the owner of the Powershell registry key in the left pane to be the Administrators group. (see screenshot below step 14)
16 Set permissions of the Powershell registry key in the left pane to "Allow" the Administrators group "Full control". (see screenshot below step 14)
17 In Registry Editor, navigate to the location below. (see screenshot below step 14)
HKEY_CLASSES_ROOT\Drive\shell\Powershell\command
18 Change the owner of the Powershell registry key in the left pane to be the Administrators group. (see screenshot below step 14)
19 Set permissions of the Powershell registry key in the left pane to "Allow" the Administrators group "Full control". (see screenshot below step 14)
20 Do step 21 (add-right click), step 22 (add-Shift+right click) , or step 23 (remove) below for what you would like to do.
A) Click/tap on the Download button below to download the file below, and go to step 24 below.
Add_Open_PowerShell_window_here_context_menu.reg
Download
A) Click/tap on the Download button below to download the file below, and go to step 24 below.
Add_Shift+Open_PowerShell_window_here_context_menu.reg
Download
A) Click/tap on the Download button below to download the file below, and go to step 24 below.
Remove_Open_PowerShell_window_here_context_menu.reg
Download
24 Save the .reg file to your desktop.
25 Double click/tap on the downloaded .reg file to merge it.
26 When prompted, click/tap on Run, Yes (UAC), Yes, and OK to approve the merge.
27 You can now delete the downloaded .reg file if you like.
How to Open and Use All apps in Windows 10 Start menu
All apps in the Start menu displays an alphabetical list of all your installed Windows apps and desktop apps in Windows 10. Some of these apps are grouped into folders with the folder name in the alphabetical list.
Starting with Windows 10 Insider Preview Build 14328, Microsoft has brought back the full-screen All Apps list while using full screen Start.
This tutorial will show you how to open and use All apps in the Start menu to open apps from in Windows 10.
Open All Apps in Start Menu
1. Open the Start menu
 , and do step 2 or step 3 below depending if you have full-screen Start turned on or off.
A) All Apps shows by default on the left side of the Start menu. (see screenshot below)
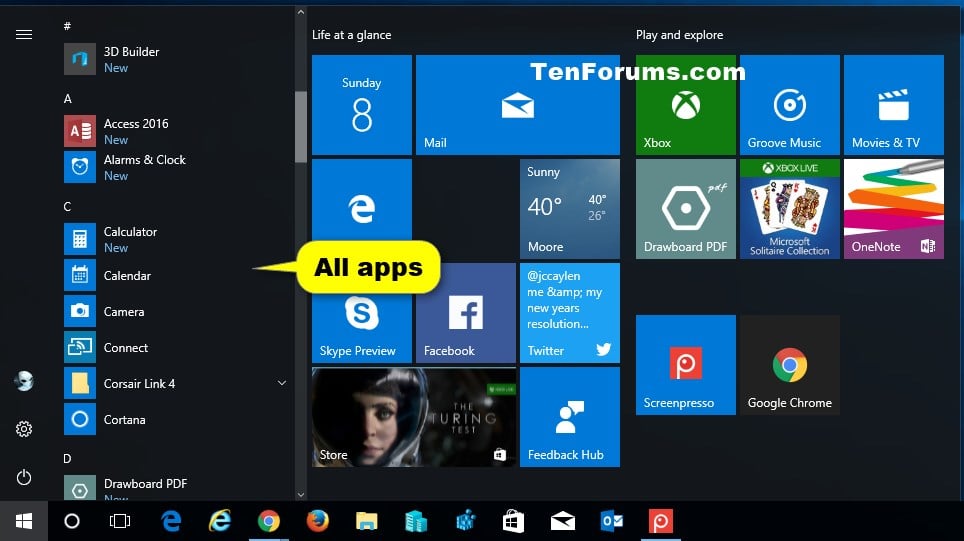
A) Click/tap on the All apps
 button towards the top left corner on Start. (see screenshot below)
OPTION TWO
View Apps with Scroll Bar in All Apps
1. Open All apps, and move the scroll bar up and down to view all apps. (see screenshot below)
2. If you like, click/tap on an app to open it.

View Apps by Letters in All Apps
1. Open All apps.
2. Click/tap on any character or letter above the listed apps. (see screenshot below)
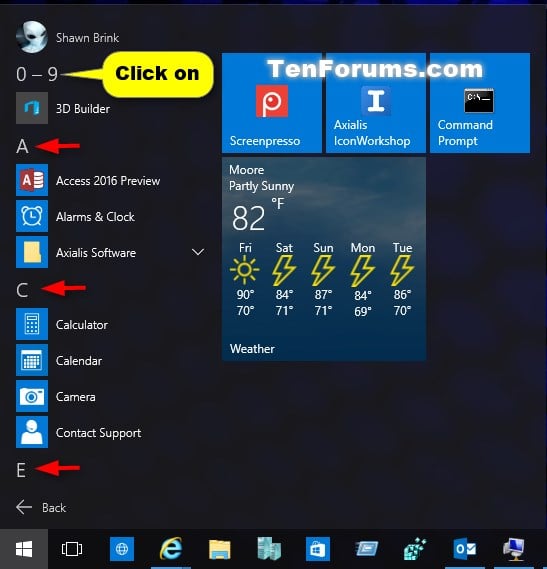
3. Click/tap on an available character or letter to jump to that alphabetical order in All apps. (see screenshot below)

4. If you like, click/tap on an app to open it.
Expand Open Folders in All Apps
A folder in All apps represents a group of shortcuts for a specific installed app or apps included with Windows.
Folder example: Windows Accessories, Windows Administrative Tools, Windows Ease of Access, Windows System
1. Open All apps.
2. Click/tap on the folder to toggle to expand or close the folder. (see screenshot below)

3. If you like, click/tap on an app or file in the folder to open it.
OPTION FIVE
Open Context Menu of App in All Apps
1. Open All apps.
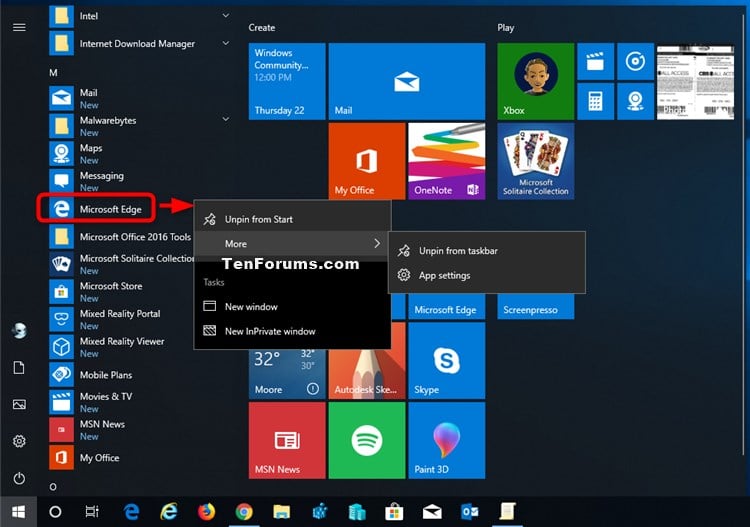
2. Right click or press and hold on an app (ex: "Microsoft Edge") listed in All apps, and click/tap on the item you want in its context menu. (see screenshot below)
That's it,
How to open a reverse tunnel through a Windows PC to access the LAN
What?
If you are trying to access a device on a NATted network, and cannot VPN in, you can use this to open a tunnel through a managed computer on the network, in order to access anything on that computer's LAN
Requirements
- You need to have powershell (with admin privileges) access to a computer on the LAN (remote background via Syncro / Ninja / etc)
- You need to have access to a cloud Linux server, a port will be opened on this cloud server that forwards traffic to a device on the computer's LAN network
- The computer needs to have a network connection that can reach the cloud server
How To Connect
Video guide here: https://www.loom.com/share/883ebba6d93146ac82a0fdd45a16aeb1
This guide assumes you have a Linux server running in the cloud
You also need to have a public SSH key added to the authorized_keys file on the server
We have one in the cloud already set up, use these commands to connect to it and open a port redirect
1) Open remote background Powershell on a computer connected to the LAN
2) Install the Openssh client on the computer
Get-WindowsCapability -Online | Where-Object Name -like 'OpenSSH*'3) Download the SSH key for the Cloud Linux server, this will let us open a port on that server
(New-Object System.Net.WebClient).DownloadFile("https://ssh.danbuntu.com/files/ceef6b96aa17610858b9eb11520343e5de8fd0a47858dbef28145f5b96e12f9e", "C:\Windows\Temp\id_rsa_remote")4) Open a reverse port forward to a specific device on the computer's LAN network
Make sure to change these variables to match your scenario
# remote IP address of the cloud server
# leave this as is, unless you are using a different server
$CLOUD_IP = "104.238.138.35"

# user name on the cloud server
# leave this as is, unless you changed it
$CLOUD_USER = "remote"

# remote port (on the cloud server) you will connect to
# this can be anything you want, as long as its not being used
$CLOUD_PORT = 65001

# local IP of the device you want to reach (on the LAN)
$LAN_IP = "192.168.1.1"

# local port of the device you want to reach (on the LAN)
$LAN_PORT = 8080


# open the connection
# if this works well, you should be able to connect to the CLOUD_IP:CLOUD_PORT, and it will redirect the connection to LAN_IP:LAN_PORT
#  [You]  ===>  [CLOUD_IP:CLOUD_PORT]  ==>  [LAN_IP:LAN_PORT]
ssh -o 'StrictHostKeyChecking no' -i C:\Windows\Temp\id_rsa_remote $CLOUD_USER@$CLOUD_IP -R $CLOUD_PORT`:$LAN_IP`:$LAN_PORT
How to set up a Linux Cloud Server
To set up a new cloud server to work with reverse port forwarding, do the following
1) SSH in to the server
2) Edit the file /etc/ssh/sshd_config and change the GatewayPorts to yes
sudo nano /etc/ssh/sshd_config3) Restart the ssh server
sudo systemctl restart sshd4) Create a SSH key and remote user, and save the public key the authorized_keys file for the remote user
# create ssh key pair
ssh-keygen -f ./sshkey -P ''

# create a user account for SSHing (username remote)
sudo useradd -m remote
sudo mkdir -p /home/remote/.ssh
sudo chown remote.remote -R /home/remote/.ssh
sudo chmod 700 -R /home/remote.ssh

# add the public key to the authorized_keys file for the remote user
sudo cat ./sshkey.pub > /home/remote/.ssh/authorized_keys
5) Download the ./sshkey SSH key, you will need to save this to a publicly accessible location where the computer on the LAN can download it, it will use this key to authenticate with the remote server to open a reverse SSH tunnel
How to Change Computer Sleep
Change Computer Sleep After Time in Settings
This will change the sleep after settings in your currently selected default power plan.
1 Open Settings, and click/tap on the System icon.
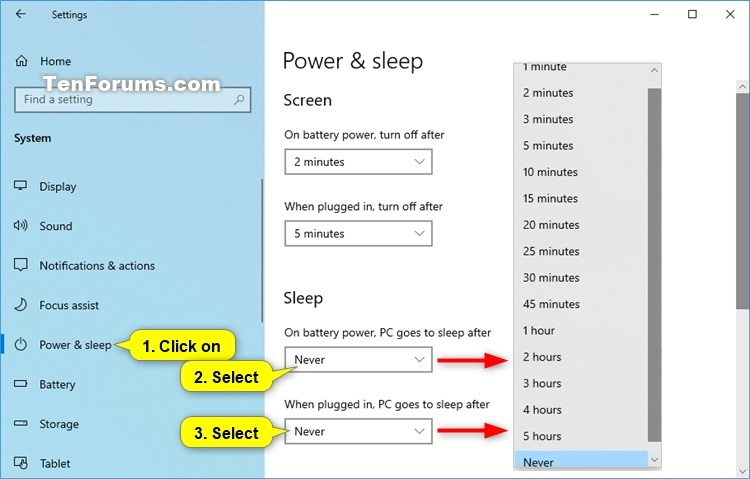
2 Click/tap on Power & sleep on the left side, and select the Sleep time you want in the On battery power, PC goes to sleep and When plugged, PC goes to sleep drop menus on the right side. (see screenshot below)
If you PC doesn't have battery power, then you will only see one option.
3 When finished, you can close Settings if you like.
Change Computer Sleep After Time in Power Plan Settings
This will change the sleep after settings in your currently selected default power plan.
1 Open the Control Panel (icons view), and click/tap on the Power Options icon.
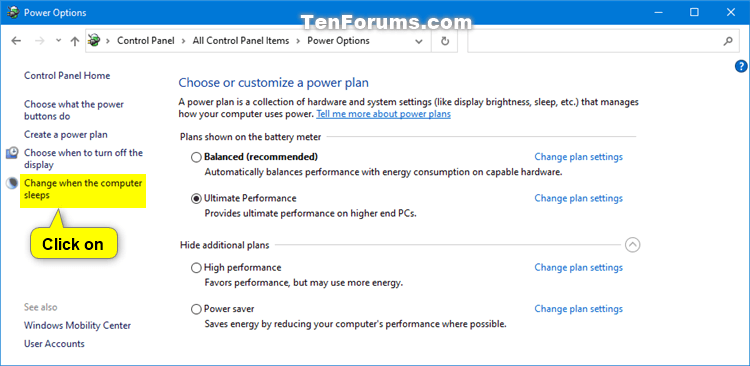
2 Click/tap on the Change when the computer sleeps link on the left side. (see screenshot below)
3 Select the Put the computer to sleep times you want in the On battery and Plugged in drop menus, and click/tap on Save changes. (see screenshot below)
If you PC doesn't have battery power, then you will only see one option.

4 You can now close the Edit Plan Settings window if you like.
Change Computer Sleep After Time in Advanced Power Plan Settings
1 Open the Control Panel (icons view), and click/tap on the Power Options icon.
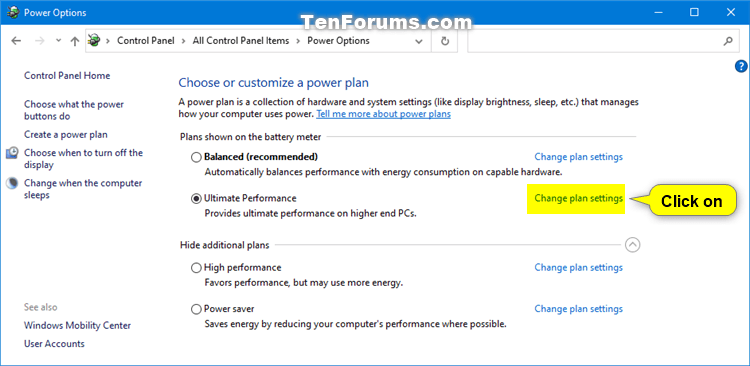
2 Click/tap on the Change plan settings link of the power plan (ex: "Ultimate Performance") you want to apply this to. (see screenshot below)
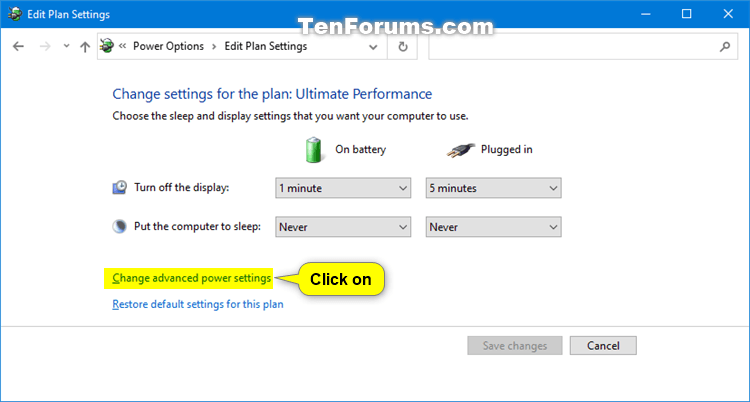
3 Click/tap on the Change advanced power settings link. (see screenshot below)
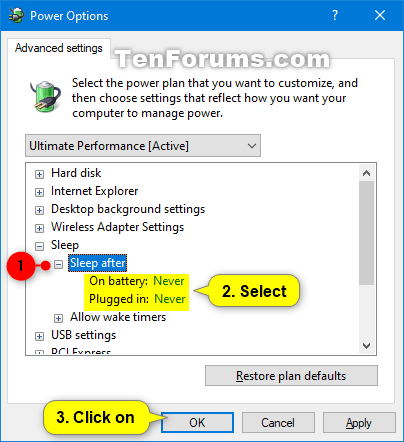
4 Scroll down and expand Sleep and Sleep after. Select the On battery and Plugged in times you want, and click/tap on OK. (see screenshot below)
If you PC doesn't have battery power, then you will only see one option.
5 You can now close the Edit Plan Settings window if you like.
Change Computer Sleep After Time in Command Prompt
This will change the sleep after settings in your currently selected default power plan.
1 Open a command prompt.
2 Type the command(s) below you want to use into the command prompt, and press Enter. (see screenshot below)
(On battery)
powercfg -change -standby-timeout-dc <minutes>OR
powercfg /SETDCVALUEINDEX SCHEME_CURRENT 238C9FA8-0AAD-41ED-83F4-97BE242C8F20 29f6c1db-86da-48c5-9fdb-f2b67b1f44da <seconds>AND/OR
(Plugged in)
powercfg -change -standby-timeout-ac <minutes>OR
powercfg /SETACVALUEINDEX SCHEME_CURRENT 238C9FA8-0AAD-41ED-83F4-97BE242C8F20 29f6c1db-86da-48c5-9fdb-f2b67b1f44da <seconds>Substitute <minutes> in the commands above with how many minutes you want for how long your computer is inactive before automatically going to sleep.
Substitute <seconds> in the commands above with how many seconds you want for how long your computer is inactive before automatically going to sleep.
Using 0 (zero) minutes or seconds will be the same as Never.
3 When finished, you can close the command prompt if you like.

Contract Testing
|
|
How to Get the Phone IP
In this guide we will learn how to get the IPv4 of the Phone.
Please Find Your Phone model below.
|
Phone Model |
Instructions for getting the IP Address |
|
Yealink T21P |
Press OK on the phone. The IP address should be shown on the first line labeled IPv4. |
|
Yealink CP925 |
1. Press the Menu icon, then select Status. |
|
Yealink W52P |
1. Pick up one of the handsets registered to the base station, then press OK. |
| Yealink T58W Yealink VP59 |
1. Press the settings icon, then select Status. 2. The IP address should be shown on the first line labeled IPv4. |
| Yealink CP965 Yealink CP925 |
1. Press the settings icon, then select Status. 2. The IP address should be shown on the first line labeled IPv4. |
Set Up Unifi
Set up Unifi on Linux
If you are using a RockPi as a controller, click HERE
Otherwise click HERE
SSH into RockPi and perform some updates.
- To SSH into the server we will be using Putty. Download and install Putty.
- Open up putty and type in the IPv4 address of your server and click open.
-
Log into your RockPi with the username
rockand passwordrock - Start with making sure we have the latest updates installed.
sudo apt update
sudo apt upgrade
sudo apt-get install ca-certificates wget -y
5. Give it a few minutes for the updates to install and afterwards run the following command to reboot.
reboot
Lets Install UniFi SDN Control Panel on Ubuntu 20.04
- Once the server is rebooted and your reconnected into the server using SSH we will now get started with running the following command.
rm unifi-latest.sh &> /dev/null; wget https://get.glennr.nl/unifi/install/install_latest/unifi-latest.sh && bash unifi-latest.sh
2. You will be prompted to keep the script which here I type in: Y
3. You will be prompted to apply some updates to the system, type in: Y
4. Now just wait while the installation proceeds to install some required software.
5. Next prompt will be to install script to be able to update Unifi Network Controller via APT, type in: Y
6. You should now be complete with the installation.
7. Lets make sure that the Unifi Controller service auto starts with the following command.
sudo systemctl enable unifi
Installing Fail2ban
Fail2ban will protect your cloud hosted Unifi Controller from brute force attacks. This script will ban people after 4 failed attempts for 10 minutes.
rm unifi-fail2ban.sh &> /dev/null; wget https://get.glennr.nl/unifi/extra/unifi-fail2ban.sh && bash unifi-fail2ban.sh
Set up Unifi on Windows
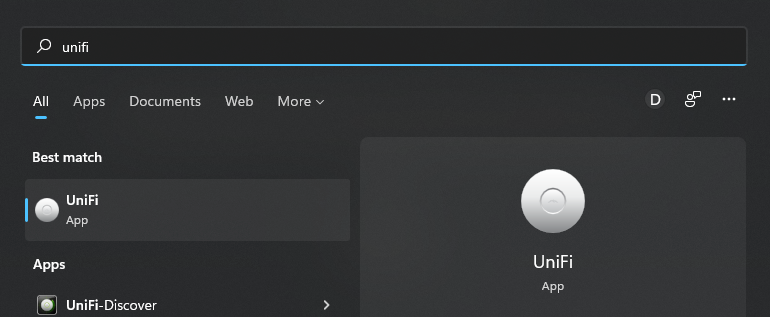
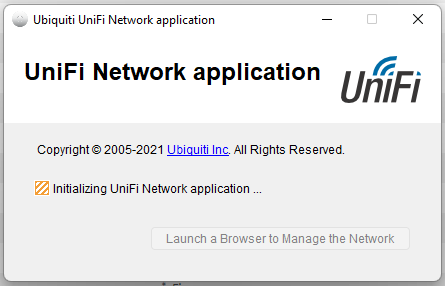
Adding the controller to the UniFi Account
1-Go to the IP of the device on port 8443 EX -192.168.1.12:8443
Make sure you type https:// before the IP or you will get a Error Message
It will tell you that "Your connection is not Private" Click on ADVANCED and then on Proceed to 192.168.1.170 (unsafe)
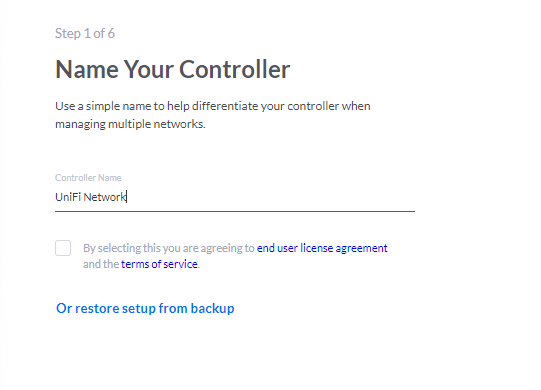
2-Here we will name our controller.
Idea Of Naming is RockPi-x where x is a unique number.
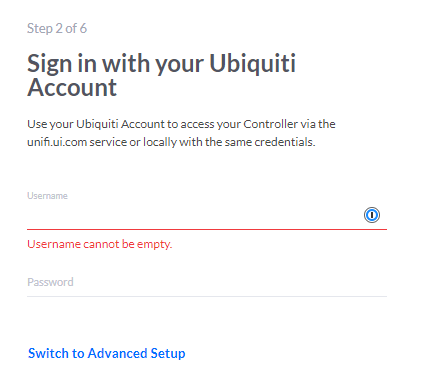
3-Next, login using our av@gtmail.us UniFi account
4-Next, Enable "Automatically Optimize my network" and click NEXT
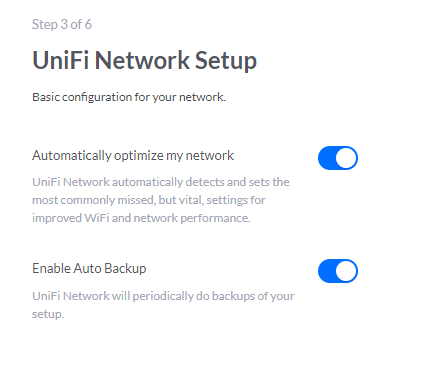
5-Click NEXT Again
6-Under WIFI Setup click Skip
7-Make sure everything is Correct including Time Zone and click Finish
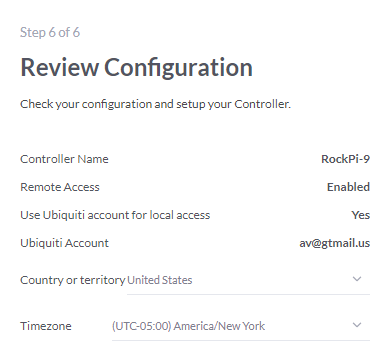
And That's it, you should see it under the UniFi app and use it as a Controller adding devices etc.
Remove / Forgetting a WIFI Profile
-
To delete a wireless network profile in Windows 10:
- Press the Windows key on your keyboard and type "wifi"
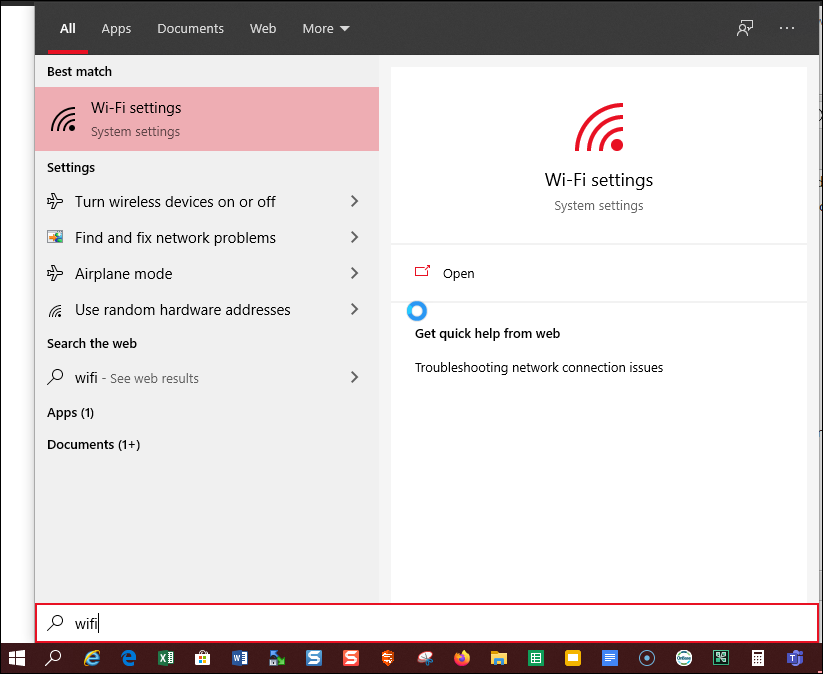
- Click on Wi-fi Settings
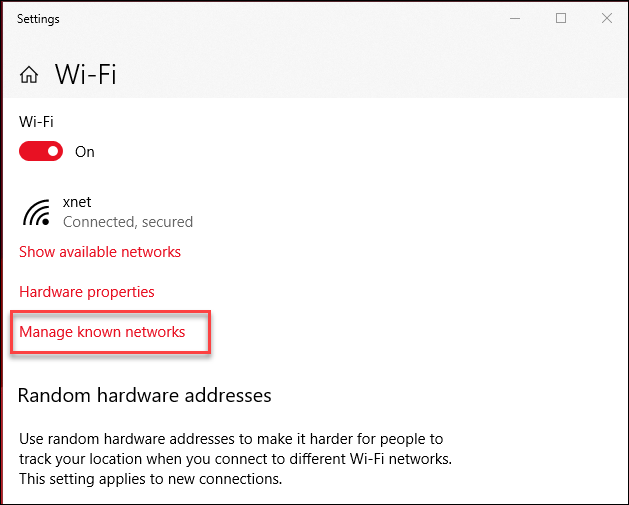
- Click Manage Knows Networks
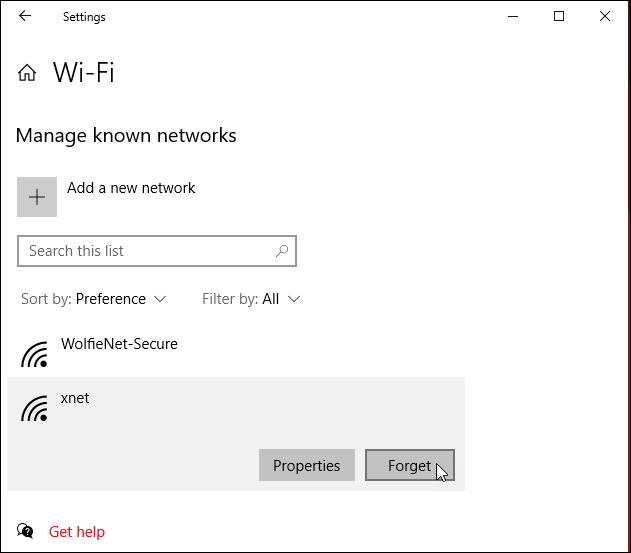
- Click on a Network name and then click Forget
- Press the Windows key on your keyboard and type "wifi"